RV Roof Maintenance
Performing RV roof maintenance every spring on your travel trailer is probably the most important habit you can develop. After a long winter and use from the previous season, there are many possible problems that can develop. If these are not detected and corrected, severe and costly damage can occur to your unit. As the says goes, out of site, out of mind!
RV Roof Maintenance Prevents Leaks
Checking the roof of your trailer is one of the most important parts of your maintenance routine. Travel trailers are notorious for developing roof leaks. The seams on your roof expand and contract throughout the year from the extremes in the weather.
Check the seams for cracking, if cracks develop a good quality all weather RV grade silicon caulk is usually the best and cheapest repair. In years past, putty cording was often used. It is a good sealant, but unfortunately it does not hold up to the elements as well as silicon.
Most travel trailers come with a one piece rubber roof now days. This is a huge improvement over the old bare metal roof that had to be coated every other year. However, this does not mean that you will never have to coat your roof. The rubber takes a lot of abuse from the sun, rain, other elements from nature. The bare minimum you should do is give it a good scrubbing after opening it up for the spring.
Check the roofing material for signs of wear and cracking. If you detect any, or your trailer is more than five years old, apply a coating of rubber roof sealant. This is a silicone based cover that is applied like paint over the surface of your roof. This can be purchased at your local RV dealer, Walmart, or at Camping World.
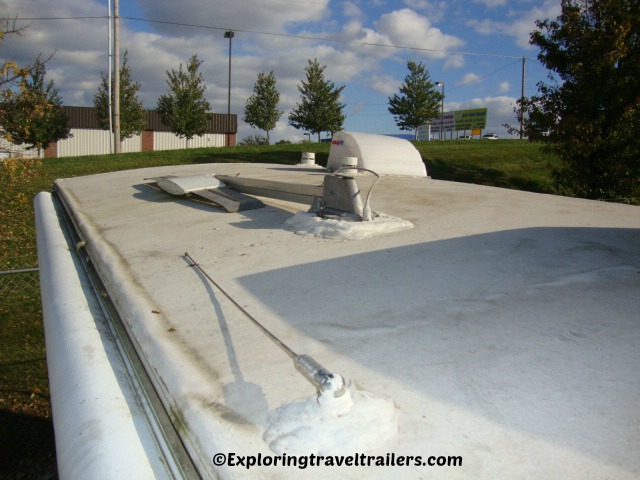
Other Rooftop Leak Points
When performing RV roof maintenance, one of the most overlooked causes of leaks is the air conditioner. The unit sits on the roof and has a rubber gasket that in time will dry rot, allowing water in the coach and can cause the interior ceiling to rot.
Performing a check on the a/c seal is easy.
- Remove the interior control panel in the coach , unplug the unit, and unscrew it from the roof.
- Now, go on the roof and lift the air conditioner , exposing the gasket and check for cracks and breaks. Again, your local RV dealer or Camping World have replacement gaskets for your unit.
- Now replace the air conditioner, tighten the screws snugly, plug the cord back in the receptacle, and replace the control panel.
Scott-Certified HVAC-R
Other places to check include the plumbing vent caps, skylight vents and TV antenna. These are common leak points and need to be checked annually.
One thing that can save some annual maintenance is placing a roof vent cover over your skylight vents. These not only protect the vents, but allow you to open the vents during rainstorms without getting wet. Plus, they allow you to keep them open for some air flow during storage, really hot weather, or when you are on the go.
Safety First!
Whenever you are performing RV roof maintenance, be aware of your surroundings on the roof. It is extremely important to keep aware of this.
Some things to be aware of...
- Ladder and the location
- Any soft spots?
- Watch out for anything that may be on the roof like your AC, TV antenna, Air Max unit over your bathroom fan, anything that may be on the roof could cause a tripping hazard.
Also, be sure to wear the appropriate safety attire like safety glasses and a hard hat. My saying goes-better safe than sorry!
Don't Put it off!
Spending a little time on RV roof maintenance may not seem too exciting, but the little bit of time and effort you put into it will save you more heartache down the road. The pay off is many years with a solid trailer that looks almost as good as the day you bought it.
Written By: Scott
Exploring Travel Trailers>RV Maintenance>Roof Maintenance

FTC Disclosure:
If you make a purchase through a link on this website we may receive a small commission on the transaction. This is no additional cost to our travel trailer friends. Visit our Advertising Disclosure page for more information
Thank you!
Recent Articles
-
RV History from 1910-1920
Jul 10, 25 01:50 PM
 RV History from 1910-1920 was a decade that saw a boom in the RV industry. During this period, the house car was more prevalent than camping trailers, the automobile became available to the common per…
 -
COVID-19
Jul 10, 25 12:50 PM
 Some basic information on how to handle RV and Camping with COVID-19
 -
Reflections on Towing Mirrors
Jul 10, 25 12:38 PM
 A good set of towing mirrors is one of the most important accessories for your travel trailer.
 -
Campground Activities
Jul 18, 24 09:27 AM
 Campground activities enhance the family connection and enjoyment of relationships. Who knew sitting around a picnic table snacking and having a game of Frisbee would be so beneficial for families!
 -
Vacationing With Your RV
Feb 24, 24 10:07 PM
 Vacationing with your RV? That's how we roll! Here are some places that we have explored in our travel trailer...
 -
Wally Byam
Feb 24, 24 10:06 PM
 Among the pioneers of the RV industry, Wally Byam is probably the most notable and interesting person you could get to know.
 -
Travel Trailer Rentals
Aug 02, 22 12:29 PM
 One of the best resources for determining if a travel trailer is right for you is to look into travel trailer rentals.
 -
Hershey Pa
Jul 27, 22 09:09 PM
 We were sitting at the intersection of Chocolate and Cocoa Avenues in Hershey Pa, on a sunny June day. The street lights were alternating wrapped and unwrapped
 -
RV Meal Planning
Jul 27, 22 09:03 PM
Are you looking for some RV meal planning ideas for your next trip? Here are some tips for your next outing. -
The Coleman Company
Jul 27, 22 08:50 PM
 I doubt there are very few people around who never heard of the Coleman Company and it's products. Coleman is the most recognizable name of camping equipment in the world today.
As Iron Sharpens Iron, So One Man Sharpens Another: Proverbs 27:17
Home About Us Contact Us Disclaimer Disclosure Privacy Policy Sitemap